Rick Sammon: Color Efex Pro Tip

I photographed the “Official Parking Man” of Old Havana, Cuba. I like the straight shot, but I wanted to remove some of the reality from the scene, which is another advantage to using plug-ins. When we remove some of the reality from an image, our pictures can look more artistic and creative.

In Nik Software's Color Efex Pro
Filter: Bleach Bypass

Effect: Intensifies an image by creating a greater difference between highlights and shadows. Adds bold tones to an image.

Filter Tip: Experiment with Saturation settings. As with many effects, less is often best, as I found with this image. This effect works well with images that have fine lines.

Photo Tip: Keep in mind that people don’t always need to be looking directly into the camera when you take their portrait.

​And check out Rick's new iPhone/iPad app with 50+ tips on using Nik's Color Efex Pro.

Before

Before

After

After

Add Two Steps

Recently, we have seen an increase in photographers using the High Pass filter in Photoshop to add edge contrast and texture detail to their images.  This is a cool technique but when you use the filter remember to add two more steps; desaturate your layer before applying the High Pass filter and always target your filter effects with a mask.

You may have seen or heard many photographers talking about how they sharpen only on the Lightness channel in L*A*B* or they make sure to change the blend mode of their sharpening layers to Luminosity or they use the Fade option with a Luminosity blend mode change.  There are many good reasons to make these switches and we suggest you use them in your sharpening or contrast boost workflow.  For the same reasons, when you use High Pass desaturate.

It is a common misconception that when you run the High Pass filter you are left with an image that is baseline 50% gray and only shows brighter or darker tonality at the edge contrast and texture detail.  Instead, High Pass may retain color information from the original image.  This can lead to color shifts or colored fringe along a high contrast edge similar to haloing.

Notice the

remaining color.

Our workflow is to copy the background layer or stamp visible if you have a multi-layer document and then desaturate via Image>Adjustments>Desaturate this can also be executed with the keyboard shortcut of CTRL+Shift+U for Windows or CMD+Shift+U for Mac.

For those who want to play or have more control you can

  • Run a Black and White adjustment instead and modify the tonality of the color arcs.
  • Use multiple layers of High Pass set to different radii.
  • Leave the color in your layer in order to generate a color boost. Watch out for fringing!
  • Use the filter on a Smart Object so you can make changes.
  • Invert your filter layer to decrease contrast and texture detail.

The second misconception is that areas that appear to be smooth after running the High Pass filter are not. Make sure to use a mask and target the filter effect to only those areas that you want to modify. In general, LIGHT does not recommend enhancing the edge contrast or texture detail on the following:

  • The sky especially blue sky.
  • Areas of constant color or tone.
  • Flowing water.
  • Out of focus areas.
  • Human skin especially female skin.

Fiat Lux!

Long Exposures in the Midday Light

It is difficult to imagine that in a day when all photographers are pushing the manufacturers for higher and higher ISO that at the same time there is a need for lower and lower ISO. The truth is I enjoy shooting 30 sec and longer exposures during the daylight hours. There is no way to reduce the ISO low enough to create such long exposures while the sun is up. 

The only way to create this long shutter speed is with the use of neutral density filters.  If you’re like me and want to attempt this very cool look, I recommend the new Lee ND filter called “The Big Stopper”. This filter requires their holder but offers 10 stops of density to help you create those long exposures.

Before Filter

After Filter

Life is short, take pictures!

Marc Muench

High Angle Shooting Tip!

By Rob Sheppard

Did you ever see the photos of Ansel Adams standing on top of his car? He had a platform built that allowed him to set up a camera and tripod on his car to gain some height. A challenge we often face when photographing landscapes is that we are too low. Too low means we have to shoot through foreground stuff that is distracting or we can't get a good perspective on the scene. We can't get above important objects so they become truncated and we cannot show their real relationship with the scene.

The obvious answer is to get higher. You can see the difference in these two shots from Death Valley showing a creosote bush in the Eureka Dunes area. You would not think that the main bush is the same one! The first shot is from a high camera angle, whereas the second one is shot from standard tripod height. The first shot gives an interesting foreground to background relationship that shows how the creosote bush fits into this landscape. The second is hardly worth considering because the bush is too high in the landscape. (The green of the creosote bush is better in the first image because I used Viveza 2 on that image, but not on the second.)

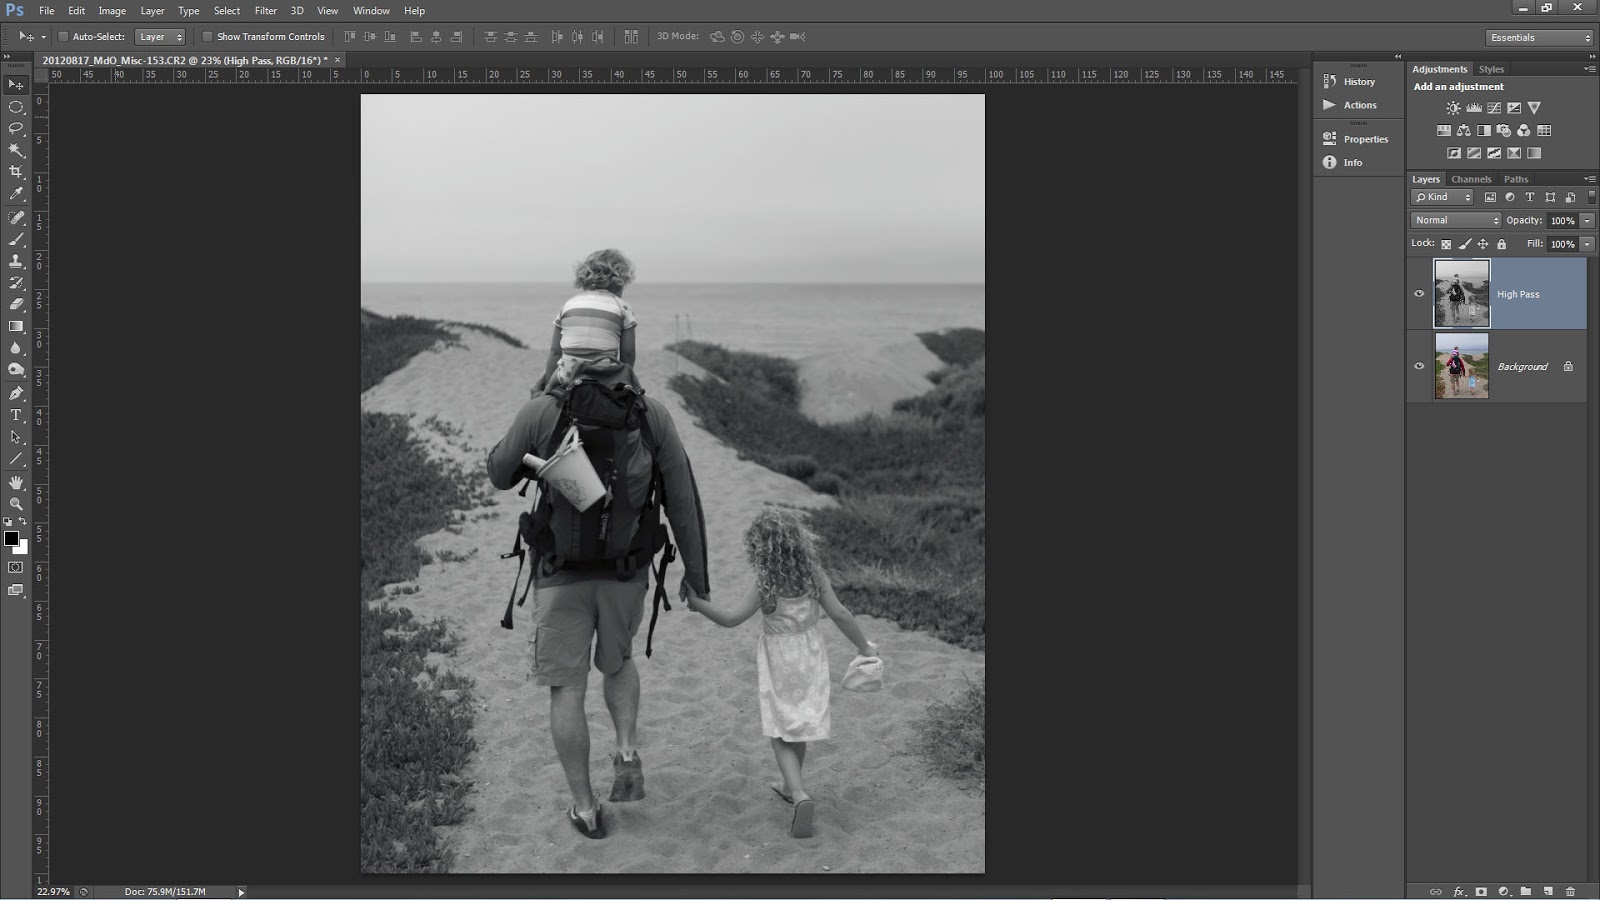
So how did I do this? Did I drive a truck onto the dunes? Bring a big heavy ladder with me? Nope. I used my tripod, but in a unique way that works very well with digital photography.

I extended the tripod legs to their max, then brought them together. I set the self-timer of the camera to 10 seconds, set up my exposure and focus appropriately (in this case, aperture priority and auto focus), pressed the shutter, then hoisted my camera on tripod over my head. I held it until the shutter released, then brought it back down.

The great thing about digital for this technique is that you can instantly see what you got and make revisions. You may need to hold the camera straighter, aim a little higher or lower, and so forth. In just a few shots, I had my shot. (I did have to do some minor cropping for a slight straightening -- it can be hard to get the camera perfectly level when doing this, but then the Crop Tool in Lightroom makes this easy to fix!).

Obviously, you have to watch your shutter speed doing this or risk unsharp images due to camera movement during exposure. With a wide-angle lens, you can shoot at a slower shutter speed and still get sharp images, though this is inherently an unstable camera position, so you can't go too low. With a wide-angle like this, it is easy to use f/8 or f/11 to allow a faster shutter speed, plus I will use a higher ISO as needed, too.

So the next time you are in front of a landscape that is giving you problems, try hoisting your camera overhead! It can be worth a try just to see what the landscape looks like from up there.

This last picture includes a shadow of me hoisting that camera overhead to get some unique views of the tufa formations at Mono Lake that actually show Mono Lake as part of the scene.

-Rob Sheppard
www.robsheppardphoto.com

blog at 
www.natureandphotography.com
robsheppard@earthlink.net

Teachers Learning from their Students

Photography Tip to Keep in Mind
by Don Monkerud

***Don Monkerud is a writer from Santa Cruz, California, and one of our students here at LIGHT Photographic Workshops. Recently, Don sent us a story that we feel is a great lesson for amateurs and pro photographers alike. ***

Anyone who photographs people, especially in public, invariably runs into the irate subject or bystander who objects to having their, or someone else's photograph taken.

My rule of thumb is always to ask permission, but occasionally I'm working too fast, already gained permission earlier, or simply 

​Image by Don Monkerud

Image by Don Monkerud

overlooked asking the subject for their permission. Sometimes such oversights can become costly, in embarrassment, rejection, mistreatment or even loss of a job.

A recent incident in the local jazz club where an experienced photographer has been taking photographs for years can be a reminder to all photographers. Over the years, he became somewhat lackadaisical about showing up at the beginning of musicians' sets, instead showing up midway through their sets and simply snapping away.

While posted signs and an announcement at the beginning inform listeners that there is to be no recording or photography during the show, the club photographer volunteers to take photographs for the club's website. The last time he showed up after a show began and started snapping away, the singer stopped the musicians in the middle of a song and demanded that he erase all the photos on his card. Who the hell did he think he was? He mumbled an expletive half under his breath, which didn't go over well either.

​Image by Don Monkerud

Image by Don Monkerud

The new photographer makes a point of showing up during the sound check to ask permission. A valuable lesson, for I'm sure the original photographer was not only embarrassed but also humiliated, and he lost his gig. The lesson is to always ask permission and not get so used to a regular gig as to become lackadaisical.

A question about usage also arises. While this has been a volunteer job, what rights does the photographer have to the work? The initial meeting with the musicians is the time to set the parameters: Can the photographer use the photos only for the club? What about art shows or sales on a website? Should an agreement be signed? etc.

Whatever rights are requested and granted, the photographer must to be aware of the first rule in taking photographs in such a setting: 

Always ask permission.

By Don Monkerud
Copyright 2011

****

We are happy that Don was willing to share this learning experience so that all of us could learn from it. If you have had a photography experience that you feel others can learn from please share them with us! Contact us at info@lightworkshops.com with your tips and shooting stories.

For more photography tips you can visit our LIGHT Photographic Workshops Page or our California Photo Festival Page on Facebook. Sign-up to receive our weekly Newsletter and be the first to see the latest updates to our workshop schedule and get more photography tips from our fabulous instructors!

Fiat Lux! 

A Great Tip from Wildlife Photography Specialist Juan Pons

Connecting with your subject

The most compelling photos are those that create a connection between your subject and your viewer. This not only applies to wildlife photography, but just about every other type, such as portrait, wedding, human interest, travel, Photojournalism, etc.

As the old cliché goes, “You never get a second chance to make a first impression”, so make sure your viewer connects with your image right from the get go.

The most effective way to create that connection is to maintain eye level with your subject, I am always amazed by how so many people will take images from a standing position without regard to their relative eye level to their subject. I see this all too often when judging competitions at local photo clubs.

​Photo by Juan Pons

​Photo by Juan Pons

For example, a beginning photographer will go to a local park or botanical garden to shoot some of the very tame and accessible waterfowl on a local pond, they will stand at the bank of said pond and as the birds are accustomed to being fed, they will approach. While standing the photographer will let it rip and take a bunch of images.

Unfortunately most, if not all, of those images will be very uninspiring. Why? Because they will show the subject while you are looking down at it, with hardly any eye contact. Without that eye contact it will be very difficult for the viewer to make a connection to the subject of your image. Also we are all accustomed to seeing ducks and other waterfowl from a standing position. An image that presents an unusual or fresh view on a subject has a better chance of having an immediate impact on the viewer, hence a good first impression.

​Photo by Juan Pons

​Photo by Juan Pons

Getting down low, very low, even lying down on the ground, to get at eye level is crucial in this situation in order to get an eye level shot.

In the two images shown accompanying this tip, I was in such a park, where the birds were tame and accustomed to humans. They would get very close looking for a handout.

I was lying down on the ground, with my lens on a beanbag getting shots as close to eye level as I possibly could. Being eye level to the Wood and Ruddy ducks present images of subjects that are engaged with the viewer and as such they are much more attractive and appealing; hopefully images that connect with the viewer.

We're excited to have Juan Pons as one of our instructors at this year's California Photo Festival, October 12-16, 2011! Juan will be here teaching wildlife photography, video DSLR techniques and more!

Click here to see all of Juan's festival events! 

Join us this year for the largest photography event on the Central Coast! Register today at CaliforniaPhotoFest.com.

Get more tips from our festival instructors by visiting our California Photo Festival Page

on Facebook!