• Home
  • Hal and Victoria Schmitt
  • Contact
  • Blog
Menu

LIGHT Photographic Workshops

Street Address
Templeton, CA 93465
805-550-4274

Your Custom Text Goes Here

LIGHT Photographic Workshops

  • Home
  • Instructors
    • Hal and Victoria Schmitt
  • Info
    • Contact
    • Blog
20110327_MdO_Poppy-64.jpg

Blog

LIGHT Photographic Workshops blog discusses everything photography related. Adobe updates, computer suggestions, accessories that can save your life and more!

The Test Shot

December 4, 2012 Light Photographic Workshops
​Killer whale attacking a Steller's sea lion

​Killer whale attacking a Steller's sea lion

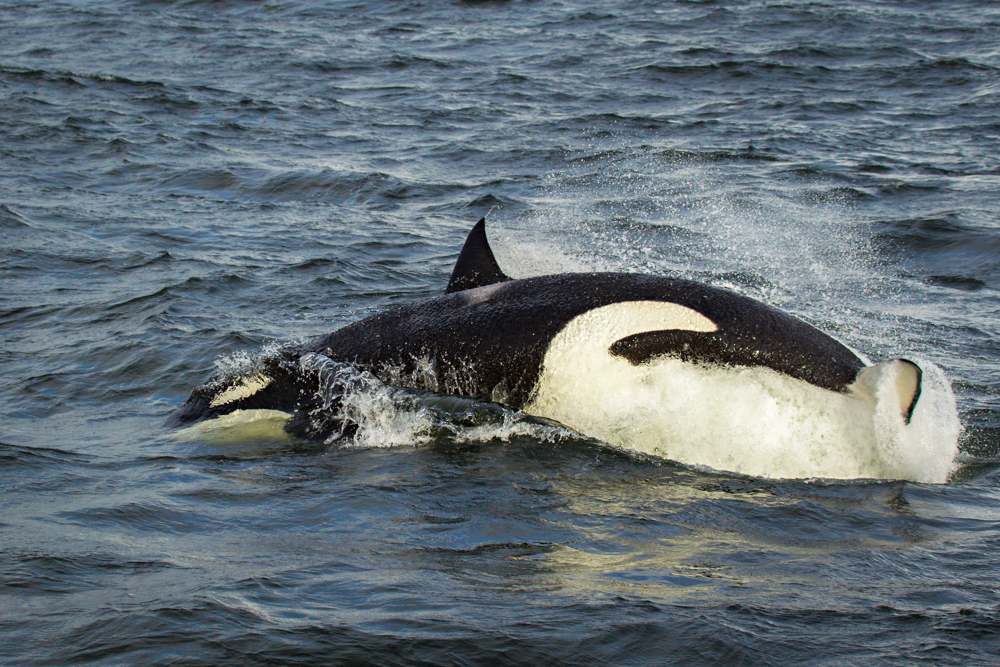
There are many shots that require you to react extremely quickly in order to capture what you want such as these whales I photographed during one of my Alaska workshops.  One of the most successful techniques you can use is what I call the "test shot."

The test shot has two primary objectives, exposure and rough focus.  When taking a test shot your actual subject is usually not in the frame.  For example, these whales break the surface in less than a second and if I wait until the subject is in the frame to find exposure I will be less than successful most of the time.  If instead I anticipate where the subject will appear or what the event will look like, I can figure out exposure ahead of time very easily.  I can also pre-focus so that the precision focus process is much faster once my subject is in frame and my auto focus sensors are properly placed.

​A humpback whale going for it in front of Devil's Thumb

​A humpback whale going for it in front of Devil's Thumb

When you make a test shot, it is often times not adequate to set exposure based on the environment/background.  You need to anticipate what will drive the exposure.  For example, in all three whale shots the critical elements are the white water and the white fins/body.  If I make a test shot of just the water and set exposure without considering the extreme tonal difference between water and white water/whale, I will, most likely, blow the highlights in the shot. When I made the test shots for these images, I set my exposure based on white not on the water/background.  You can use rules of thumb to underexpose for the predicted highlights but I prefer actual meter data, when I can get it.  In these examples, I changed my camera's metering mode to Spot and then I set exposure off of something white.  I actually used the boat's wake but a white sheet of paper would work as well.  As long as the white is under the same lighting conditions as my subject, my exposure will work perfectly.

​.1" earlier

​.1" earlier

This process is simpler when shooting in Manual exposure mode but can be used with Aperture or Shutter priority and auto exposure lock.  Once I have my exposure, I pre-focus to the expected subject distance and take a test shot and evaluate. With my exposure and pre-focus set, I am much better prepared to quickly execute the actual shot when the action occurs.

I use test shots all the time to give myself the advantage when something might happen and my reactions have to be perfect. When I am out photographing, people find it odd that I am shooting every now and again at what appears to be nothing. But my "strange" behavior pays off.  If you stack your deck ahead of time you will enjoy success in a more consistent and repeatable manner. 

Fiat Lux!

In tips Tags Alaska, photo tour, Hal Schmitt, Bull Schmitt, digital photography, action photography, wildlife photography, workshop
← Alaska Time LapseTopaz Webinar with Hal →
Use the code "LightWorkshops" and receive 15% off of Photomatix Pro.

Use the code "LightWorkshops" and receive 15% off of Photomatix Pro.

  • Adobe
  • Alaska
  • Bull Schmitt
  • California Photo Festival
  • Canon Explorer of Light
  • Click!
  • digital photography
  • Hal Schmitt
  • HDR
  • Lightroom
  • Lightroom 4
  • panorama
  • photo tour
  • Photoshop
  • Really Right Stuff
  • Rick Sammon
  • Topaz Labs
  • Victoria Schmitt
  • video
  • wildlife photography

ARCHIVES BY DATE

  • March 2015 (1)
  • September 2014 (1)
  • August 2014 (1)
  • July 2014 (3)
  • June 2014 (1)
  • May 2014 (1)
  • April 2014 (2)
  • November 2013 (3)
  • October 2013 (3)
  • September 2013 (6)
  • August 2013 (5)
  • July 2013 (2)
  • June 2013 (4)
  • May 2013 (5)
  • April 2013 (4)
  • March 2013 (6)
  • February 2013 (3)
  • January 2013 (3)
  • December 2012 (4)
  • November 2012 (1)
  • October 2012 (3)
  • September 2012 (3)
  • August 2012 (5)
  • July 2012 (2)
  • June 2012 (5)
  • May 2012 (4)
  • April 2012 (4)
  • March 2012 (2)
  • February 2012 (1)
  • January 2012 (6)
  • December 2011 (1)
  • November 2011 (2)
  • October 2011 (2)
  • September 2011 (13)
  • August 2011 (9)
  • July 2011 (9)
  • June 2011 (5)
  • May 2011 (18)
  • April 2011 (7)
  • March 2011 (10)
  • February 2011 (12)
  • January 2011 (7)
  • December 2010 (6)
  • November 2010 (5)
  • October 2010 (3)
  • September 2010 (7)
  • August 2010 (2)
  • July 2010 (20)
  • June 2010 (6)
  • May 2010 (4)
  • April 2010 (8)
  • March 2010 (12)
  • February 2010 (8)
  • January 2010 (9)
  • December 2009 (9)
  • November 2009 (13)
  • October 2009 (18)
  • September 2009 (25)
  • August 2009 (38)
  • July 2009 (26)
  • June 2009 (18)
  • May 2009 (9)


BLOG     |     NEWSLETTER     |    VOLATUSWINE

The images on this website are protected by federal copyright registration by each individual photographer/creator. Any unauthorized use is a federal offense with penalties of up to $150,000. Unauthorized use includes any copying of images from this site.

SIGN UP TODAY FOR ONE OF OUR PHOTOGRAPHY WORKSHOPS AND TAKE YOUR PHOTOGRAPHY TO THE NEXT LEVEL!​