Creative Light Softboxes

Recently, I received a large number of Creative Light (http://www.creativelight.com/) softboxes as part of our relationship with the MAC Group.  These are entirely new so I wanted to give them a thorough test before really discussing them with the blog following. 
After a few weeks and a few thousand test shots, I am officially a huge fan of these softboxes.  Setup is simple with color coded parts and quick but strong "connections."  The pieces demonstrate bombproof construction. The design is good and the tolerances are tight yielding no light leaks and a very solid feel.  With flexible steel construction, the boxes are still relatively light but maintain shape very well even out in the windy, Paso Robles area vineyards.  With that said, always remember to use a solid stand anchored with a sandbag as necessary.

The softboxes attach to strobe specific speed rings allowing a fit for almost every major brand out there.  I have mine set up for use with the ProFoto system. 
Creative Light offers two choices for the boxes either a flat front or a recessed front.  We have the recessed front which I prefer since a grid may be attached to control the light even more. 
The light is beautifully soft and even with or without the interior diffuser.  I shot all of the boxes with and without.  There is a difference but only slight.  As you would expect with the interior diffuser you must run your strobes at a slightly higher output power but you do get a more even light across the entire effective area.  We used a Sekonic meter to test as well as the subjective analysis of our Mk 1 Mod 0 eyeball (a little Navy speak thrown in there.  It seemed that every piece of equipment had a Mk and mod (modification.) So we always called the unaltered eye Mk 1 Mod 0.)

What seals the deal for me are the prices.  I have normally used ProFoto softboxes and for my use, these are equivalent or better at 55-60% of the cost.  Moreover, the MAC Group offers Light clients some even better deals (as many of you have taken advantage of!)  With the MAC/Light deals the cost comes down to 40-50% of a ProFoto option. 

Ya'll know I am a big fan of effective, efficient, and economical solutions.  In my simple, ex-fighter pilot opinion Creative Light softboxes are all three.

Cheers and see you at Monday Night Light!

Hal

TOPAZ Detail - Checking it out today for the first time!

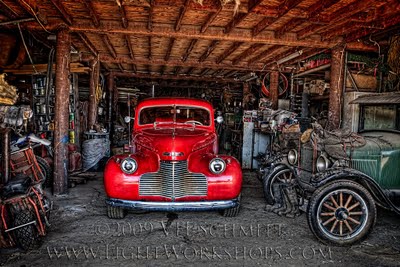
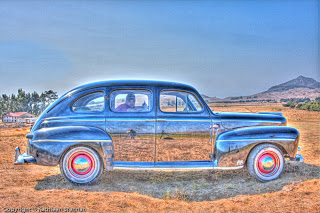
Duval Ranch Red Plymouth
Canon 5D Mk II, EF 24-70mm f/2.8L, Induro C213, RRS BH-55
Lightroom, Photomatix Pro, Photoshop, and Topaz Detail
Topaz Labs recently provided Light with their plug in suite.  I finally had a quick opportunity to try the newest addition to their line Detail.  The image above is a five shot HDR taken at the Duval Ranch in San Luis Obispo during our recent HDR Intensive workshop. 
I shot a series of six images with the Canon 5D Mk II using AEB and manual exposure compensation.  I always like to use the camera's automated processes as much as possible to speed my shooting.  It really helps when shooting for HDR source since the faster you can take the shots the less chance of anything moving. 
As a Lightroom user, I imported the shots with my HDR Prep preset (Tone Curve - Linear / Sharpening Amount slider - 0) and then exported to Photomatix Pro with the plug in.  I almost always tone map the radiance file twice.  The first is always as realistic as possible and the second is as far from reality as I can get.  When using the Lightroom plug in it is required to rename the first tone mapped file before sending the images again. 
After both tone mapped images are back in Lightroom, I give them a quick optimization in the Develop module and then my normal workflow is to create a stack by selecting both and then Edit In>Open as Layers in Photoshop.  Once loaded into Photoshop, I arrange the layers as required, modify blend modes, copy, and mask as desired to get the proper effect. 
I normally run a creative sharpening or sharpening for content workflow in Photoshop but for this image I used Topaz Labs' Detail for that job.  The interface was amazingly simple and I was able to perform "sharpening" and detail enhancement at small, medium, and large levels at the same time!  I found this to be a huge boost in efficiency (and ya'll know I love something effective and efficient.)  I'll run a quick demo video of the interface soon.
I also used Detail to desaturate a bit of the image in an effort to make the red car pop a little more.  When Detail finished I added a quick vignette using a curve set to Multiply blend mode.
This was a fun first effort with Detail and I really look forward to becoming more familiar with the software.  Take a peek at the plug in at http://www.topazlabs.com/.
Fiat Lux!

Hey Hal?

The temptation of forbidden Photoshop knowledge?
After 16 straight days of class here at LIGHT, time for another episode of "Hey Hal?"  You may recall this is our new forum to highlight common questions here at the school.

Last week we enjoyed Charles Cramer's Digital Printing for the Fine Art Photographer and the number one question during all those Curves and Masks was, "Where is my brush?"  In this simple fighter pilot's opinion this is one of the most asked Photoshop questions of all time.  99/100 times the answer is "Check Caps Lock."  When Caps Lock is on the normal brush symbology disappears.  Sometimes even this small difference from the norm is enough to throw off the workflow.  So when the brush disappears, first look to Caps Lock.

We'll make it a two-for Wednesday, the second most asked question last week was "Why isn't anything working?"  How is that for general?  Interestingly, there is usually one answer that remedies this common Photoshop roadblock.  Hit Ctrl/Cmd + D to deselect (control for Win and command for Mac.)  When he have an active selection Photoshop will only allow changes to that selection.  Where this sometimes trips our workflow is when a very small selection is active and we don't know it.  Sometimes the selection is so small the "marching ants" are very hard to find.  If it seems that nothing is working try a quick deselect and assess.

As a quick addendum to the previous paragraph, sometimes being stuck in Quick Mask will cause strange happenings as well.  You will most easily recognize an inadvertent Quick Mask situation by checking your Layers Panel.  Highlight a layer and see what color or tone is used to highlight.  If you see a dark grey, you are probably in Quick Mask.  Hit the "Q" key to get out.

If you have run across a common question or occurrence that others should know about please send to Hal@LightWorkshops.com

Fiat Lux!

Detailed Sharpening Mask Step-by-Step

Here are Light's guidelines for part of the Sharpening workflow.

This mask creation workflow gives you a starting point to build a very detailed mask to use in conjunction with your sharpening layer. You may go a step further and create an action to do this for you.

-Copy your background layer and rename the layer “Sharpen”
-Go to the Channels Panel and choose the channel (red, green, or blue) that has either the best contrast or is the best black and white image. Play around with all to see which you prefer.
-Copy the desired channel by dragging the channel icon to the Create New Channel icon at the bottom of the Channels Panel.
-With the “Copy” channel active, go to Filter>Stylize>Find Edges
-Invert the “Copy” channel by Image>Adjustments>Invert or by typing Ctrl/Cmd + I
-Remember the basic rule of masks – white reveals and black conceals. As you use Levels and your brush you want the image to be white where you want sharpening and black where you don’t.

-Open a Levels adjustment and increase the contrast by going to Image>Adjustments>Levels and move the white and black sliders.
-Paint with black or white as necessary.
-Go to Filter>Noise>Median and enter 3ish pixels.
-Blur the channel by going to Filter>Blur>Gaussian Blur and enter a value from .5 to 5 pixels depending upon image size.
-While holding the Control or Command key, move your cursor over the Copy channel icon and click the mouse, this will load a selection.
-Throw the channel copy away.

-Go back to the Layers panel and add a layer mask to your Sharpen layer.
-Sharpen the image. The layer mask will determine where the sharpening is effective. At any point you may paint on the layer mask with black or white to change the effective sharpening.

Fiat Lux!

Hal

HDR from a Seminar Participant


© 2009 Allan Duff
The image above is a tone mapped high dynamic range (HDR) file from Allan Duff, President of the NV Camera Club in Las Vegas.

I was fortunate to speak with Allan and his club earlier this year and we discussed HDR capture and processing techniques as well as some Lightroom. It is always great to receive work from photographers who attend my seminars and then put the info to good use. Nice work creating a great image!

I also attached Allan's three component files below.


We'll be covering HDR here at Light again in September. Check out http://lightworkshops.com/HDR_LosOsos_Workshop.html for details.
Fiat Lux!

Epic Canvas Weekend


LIGHT just finished another canvas printing, finishing, and gallery wrapping weekend course. I know I am biased but there is no place else in the world that you can learn canvas like LIGHT.

We spent the last two days learning everything about the canvas media itself as well as optimizing prints for canvas. After the prints were made we coated, stretched (by hand and machine!), and finished the pieces with an incredible archival process.

Love it or hate it, there is no more effective, efficient, and economical way to get big prints on display than the canvas gallery wrap.

Fiat Lux!


Morro Bay Pano

4 Shot Stitched Panorama
Canon EOS 5D Mk II, EF 24-70mm f/2.8L, Handheld

Day five of Charles Cramer's Digital Printing for the Fine Art Photographer here at LIGHT. Should be another good day in the lab as everyone's image optimization and output workflow are dialed in. We will step up to larger prints today using roll media on the Canon ipf5100s and ipf 8100.
We worked with photo media yesterday printing on Canon Satin and RCPL (resin coated photo luster.) We will move into some Fine Art media today. Although I have a few different types in house, I only use Premier Art's Generations Fine Art media. It completely blows away all other fine art or matte media for color and L* (Dmax.) All of the cool specs are at www.PremierArt.info If you are ever interested in picking up some Premier media please shoot Anna an email at inkjetstation@cox.net and mention Hal sent you from LIGHT. Anna's prices are great and she gives an additional discount to LIGHT clients.
Remember to visit yesterday's post and sign up for Monday Night Light!
Fiat Lux.

Border Effect Step by Step

In class here at LIGHT with Charles Cramer and a few of the students discussed the border effect from one of my recent video tutorials (http://www.youtube.com/watch?v=wY2Kt64hu-Y). They thought it would be a good idea if I posted the steps online. So here they are.

The “LIGHT Border” step-by-step

Finish the image
Resize
Sharpen
Flatten
Create a new layer
Select all (CTRL A)
Edit>stroke
Enter 1 pixel width
Choose Black as the color
Ensure “Inside” is checked
Deselect
Image>Canvas Size
Check “Relative”
Enter 1 into Width and Height (you can change the size as desired)
Ensure Canvas Extension color is white or black
Create a new layer
Select all
Edit>Stroke
Enter 20 - 40 pixel width (you can change the width as required)
Click on the color square. A “Select stroke color” dialog box opens.
Move your mouse into your image and a select a color for the border (color should be light enough that black will show up)
Ensure “Inside” is checked
Deselect
Click the Fx tab on the Layer palette.
Click “Inner Shadow”
Adjust Distance, Choke, and Size until desired effect is achieved.
Image>Canvas Size
Check “Relative”
Enter 1 into Width and Height (you can change the size as desired)
Ensure Canvas Extension color is white or black
To change the stroke color
Select the layer with the thick stroke
Click the Fx tab on the Layer Palette and select “Color Overlay”
i. Click the color swatch and select a new color from the image
ii. Click “Ok”

Cheers!

Hal

Ben will be Back Soon!

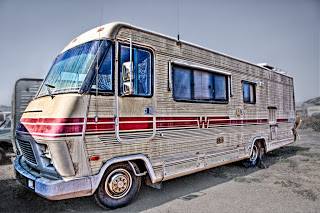
" Dreaming of Roadtrips Past"
In honor of Ben Willmore coming back to LIGHT in a month or so I put up a the closest thing I could find to a vintage bus. Ben will be here in October for an encore presentation of his "Digital Fine Art Nudes." http://www.lightworkshops.com/fine_art_nudes.htm There are a few spots left so come join us and learn from an amazing photographer, Photoshop Hall of Famer, great instructor, and all around good, beer-loving guy.

The Winnie above is a 5 shot HDR image taken out at a local ranch. I processed in Lightroom, Photomatix Pro, Photoshop, and Lightroom.

For the Canon shooters out there the G11 was announced this morning. Looks like a nice upgrade to the high end of the Powershot series. Check it out at http://www.dpreview.com/news/0908/09081908canong11.asp

Fiat Lux!

Hal

Another Maui Shot

Canon 5D Mk II, EF 24-70mm f/2.8L, hand held

Was working a few images to send to the models we worked with in Maui and thought this might be a fun one to post to the blog.

I shot the image with a Canon 5D Mk II and a 24-70mm f/2.8L handheld about 30 minutes before sunset. Nikki, our model, was brave enough to lie down in a relatively cool stream while we shot from every conceivable angle and level.
As a dedicated Lightroom user, I imported the image, edited, and managed appropriately before performing some basic adjusments in the Develop Module. I wanted a little extra retouching and find the Photoshop interface gives me the power and control necessary to get it right. I removed some issues/distractions in the water and then performed a quick Liquify on Nikki's left hand. Hindsight being what it is I think I should have modified the right hand a bit as well. The angle of the shot and the focal length I chose "amplified" the hand and I find it a distraction now. Fortunately, I maintain a Master file within LR and will experiment with reducing it's impact.
As you might guess, I am comfortable with optimizing, enhancing, removing, or whatever else I need to do in order to create the look I want.
Cheers!
Hal

Thanks Bob!

@2009 Bob Canepa
A 3 shot HDR taken by Bob Canepa during last week's HDR Intensive here at LIGHT. Bob shot a Canon EOS 5D Mk II to generate the component shots for this image.

Thanks to the Duval Ranch for positioning some amazing vehicles around the property so we could shoot at will.

We just added another HDR Intensive course in September so come on over to LIGHT and check it out! Whether realistic, hyper realistic, grungy, mixed, or whatever your creative heart desires we will learn how to shoot, process, and print it.

Dinner break day two of Charles Cramer's Fine Art Printing for the Digital Photographer. If there is one thing about our digital darkroom it is we are equipped to teach and execute high end printing. With eight Canon ipf 5100s, a couple of Canon 9500s, and a 44" Canon ipf 8100 we are dialed in.

Fiat Lux!

Hal

Kathleen's HDR Shot of Me!

©2009 Kathleen Brennan

Kathleen Brennan shot me inside an old car out at the Duval Ranch during last week's HDR Intensive here at LIGHT. Looks like the image was tone mapped and processed with two different settings in Photomatix Pro and then the results were stacked in Photoshop. Probably a little blend mode fun to enhance the effect. Nicely done!
Thanks for the shot. I will not lie to you though, I'm not a handsome man to begin with and Photomatix Pro and Photoshop don't do me many favors.
Fiat Lux!
Hal

September is Looking Great! Sign up now!


For those of you looking for something to do on Labor day weekend, we will have our 3-day Lightroom course with Hal Schmitt. This class is really helpful for the photographer who is trying to get a seamless workflow down for their photography.


We are just now adding another HDR class September 15-19 which is Tuesday-Saturday. We will be able to photograph some awesome cars and a few incredible areas that we have discovered that are perfect for HDR. Our sponsor, Really Right Stuff is letting us borrow their Panorama gear to show you how to create and process HDR panoramas as well!


And don't forget! Canon is coming into town for their first of many Canon Explorer of Light Lecture Series for only $5! 2 hours for $5 AND cookies? You can't go wrong. We will feature Jennifer Wu, one of their newest additions, for a three day Canon Field Photography workshop on the Central Coast with Canon Gear Rep Jim Rose bringing some awesome Canon lenses to play with!
Keep looking at the courses schedule for more additions! October will feature Canon Flash, Rob Sheppard, Jack Davis and Ben Willmore! Catch them now before they are gone!


Change of Subject


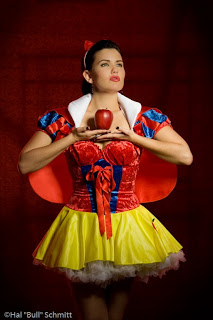
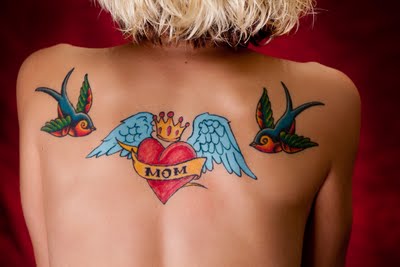
We've been a little HDR focused on the blog recently so I thought I would change it up and attach a shot from our studio. LIGHT is, of course, all things photographic.

The image is from a test shoot we did last week with the new Creative Light softboxes. So far, I highly recommend them and the prices are great, especially for LIGHT clients.

Fiat Lux!

Bull

HDR Guidelines Part 2


This is part 2 of Bull's HDR guidelines here at LIGHT.

Camera
-Manual mode
- ISO: 100 Canon / 200 Nikon
-Constant Aperture = vary shutter speed only
-Constant White Balance
-Continuous shooting drive mode – high if you have it
-Focus – One shot or one time.
-Use AF to assist and either hold AF-On button continuously through the shots or switch to manual focus after focus lock is achieved.
-Shoot RAW
-Use auto exposure bracketing (AEB) functionality as much as possible
-Know your camera’s capes and lims
-Use +/- 2 EV jumps (new Nikons only have 1 EV jumps available)
-Some scenes may use +/-1 EV for better results

How Many Shots?
-Depends on the scene’s dynamic range (DR)
-Meter the highlights and shadows and determine the difference between the two in stops
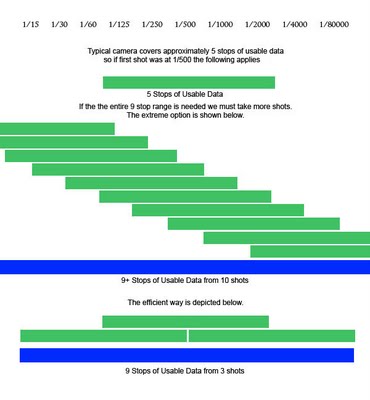
For example, with a constant aperture and ISO the highlights are exposed properly at 1/8000 and the shadows at 1/15, there is a 9 stop difference.
-Shoot the required number of shots at your desired interval. In our above example, take nine shots 1 EV apart or 4-5 shots 2 EV apart (sometimes even with a 9 stop difference as above you can cover with a three shot sequence at 0, +2, and -2 EV)
-Use AEB to capture the full range for increased efficiency.
-First shot determines the starting point of the full DR captured with your series of shots
-In the example above (highlights at 1/8000 and shadows at 1/15,) full stops between are shown below. 1/500 is the center point of the dynamic range. Only whole stop increments are depicted. Each green bar shows one shot and the associated range.


-We arrive at the efficient method by shooting our first shot in the middle of the range and then shooting two addition images at +2 and -2 EV. New Nikons will need to shoot 5 images at the max 1 EV spacing to generate the 9 stops of usable data.
-Biasing the initial capture EV will skew the range as well.

-AEB may be used in series to expand range even further
-For example take first 3 shots at -2, -4, and 0 take second three shots at +2, +4, and 0
-Total range will be 13 stops of data (-4 to +4 = 8 stops plus 2.5 usable at each end.)


Part 3 next week.


Fiat Lux!